
a.k.a. Anti-Civ Arson Booklet
Translated from German. Also available in French.
[Note from Warrior Up: We’ve chosen not to make this text available as a PDF because we believe that if an arson guide is distributed in printed form, some people will inevitably keep it in their homes or in movement spaces, which the police would be happy to find during a repressive operation. In addition, a printed guide collects forensic traces from anyone who has interacted with it, so if the police recover a copy, they can, with some work, determine who has read it. We recommend that you only read incriminating guides digitally, using Tails. If you’d like to be able to read the guide offline, simply download the HTML file during a Tails session (in the Tor Browser, right-click anywhere on this page and select “Save Page As…”) and then copy it to a LUKS-encrypted USB so that you can access it later during an offline Tails session.]
Contents
- The Accelerant
- The Pyrotechnic Igniter
- The Electric Igniter
- The Egg Timer Switch
- The Ice Block Switch
- The Digital Switch
- Some Thoughts on the Psychological Aspects of Militant Actions
“There is a time when the operation of the machine becomes so odious, makes you so sick at heart, that you can’t take part. You can’t even passively take part! And you’ve got to put your bodies upon the gears and upon the wheels, upon the levers, upon all the apparatus, and you’ve got to make it stop!” – Mario Savio
The cornerstone of a sustainable arson campaign is reliable delayed ignition. However, for small groups without a secure procurement network (which is most of them), many older instructions for making timers are simply no longer feasible.
The rise of online stores in recent years has made it almost impossible to get transistors or ICs from local electronics stores with cash. Even if there is such a store in your area, caution is advised as the police are sometimes surprisingly good at tracing back electrical components. Internet ordering is also unfortunately not an option for our purposes. If you try to solder the required parts out of cheap devices from the dollar store, you will quickly realize that the surface mount device (SMD) components used today are usually much too small to solder by hand.
This guide therefore came out of the desire to share our experience with materials that are readily available at supermarkets or hardware stores. It can also be considered an update to the ELF guide “Setting Fires with Electrical Timers”, which is still well worth reading.
– Angry Birds Commando, Fall 2024
The following pages are intended for adults. There are two reasons for this. Firstly, you can expect a significant amount of repression if you are charged with arson. If you can’t do the time, don’t do the crime.
Secondly, if you are negligent in your choice of the target or in the storage of incendiary devices, you put yourself and others at risk. We really don’t need any more wildfires. But with proper care, the recipes here are no more dangerous than a barbecue.
When a fire is successfully set, it destroys most traces and gives you time to get away. Unfortunately, igniters with a timer always leave a degree of uncertainty as to whether it actually worked. If an incendiary device fails to ignite, not only does the action fail, but it also provides the authorities with a lot of useful information. The antidote is: test, test, test.
It’s possible that the materials you find will behave differently than the ones we used, such that you will need to adjust the recipes. Again, this means testing, testing, testing… And then, temperature and weather are also factors. And thus, the need for even more testing.
An old bomb-making rule is that explosives and detonators should never be transported or stored together. It makes sense to apply this to incendiary devices as well. Store accelerant and igniters in separate containers, which are preferably fireproof. A few plastic bottles of water in each container is also a good idea as extra insurance. Also remember that batteries can get very hot if you have caused a short circuit. This can happen, for example, if open wires come into contact with a metal box. In general, though, you don’t want to leave these devices at home. If they are found, they are more than a little suspicious…
The Accelerant
This is the easy part — don’t make it a science. Sure, you can dissolve Styrofoam (lots of Styrofoam, you need at least half a cubic meter) or pieces of soap in gasoline and make your own “napalm”, but … what for? Gasoline, liquid barbecue lighter fluid, chafing fuel, ethanol gel, kerosene … all burn brilliantly! 1 Depending on the quantity, it may not even be particularly suspicious to have some on the shelf. However, depending on the nature of the cable shaft, it can help to use a gel-like accelerant to prevent it from seeping away. 2 In terms of quantity, it is difficult to make a general recommendation. In any case, more is usually better. For a few cables, you’ll need at least 500ml.
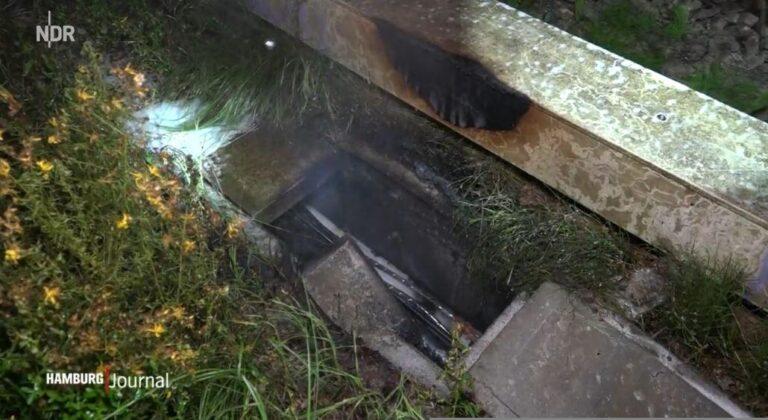
Pour the accelerant into thin-walled plastic bottles or Ziploc freezer bags. In the latter case, additionally secure the opening with tape to keep the contents from spilling into your bag during transportation. 3
The ideal location to place the accelerant is under the cables, but this is not always an option. No problem — it will flow downwards after ignition.
In principle, this is already enough for a simple arson: place it, ignite it, run away. If you are sure that no one will notice the fire soon after it is lit, this may even be the better option, as it eliminates the risk of an igniter failing. If you decide to use gasoline and light it directly, pour out the gasoline and light it by throwing a burning firelighter cube or a burning piece of cloth (not your used socks!) from a short distance.4 Without this short distance, the ignition of the accelerant may burn you.
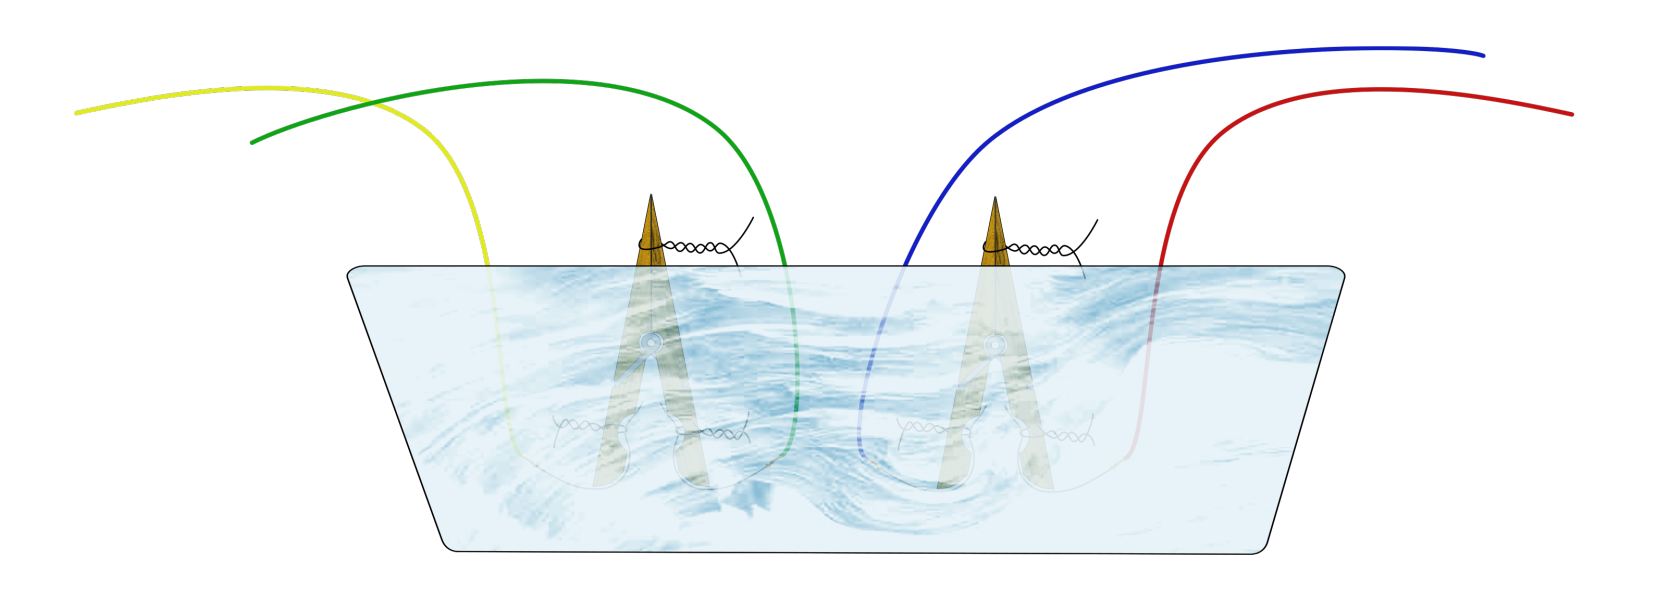
However, with railroad signal cables, as with most other targets, we can assume that the fire will be noticed fairly quickly. This is where igniters with a timer come into play.
The Pyrotechnic Igniter
With this simple igniter, reasonably precise delays of up to an hour can be achieved. The only disadvantage is that it creates a little smoke and smell. However, for all targets that are not in the middle of the city, premature detection is very unlikely due to the smoke, especially at night.
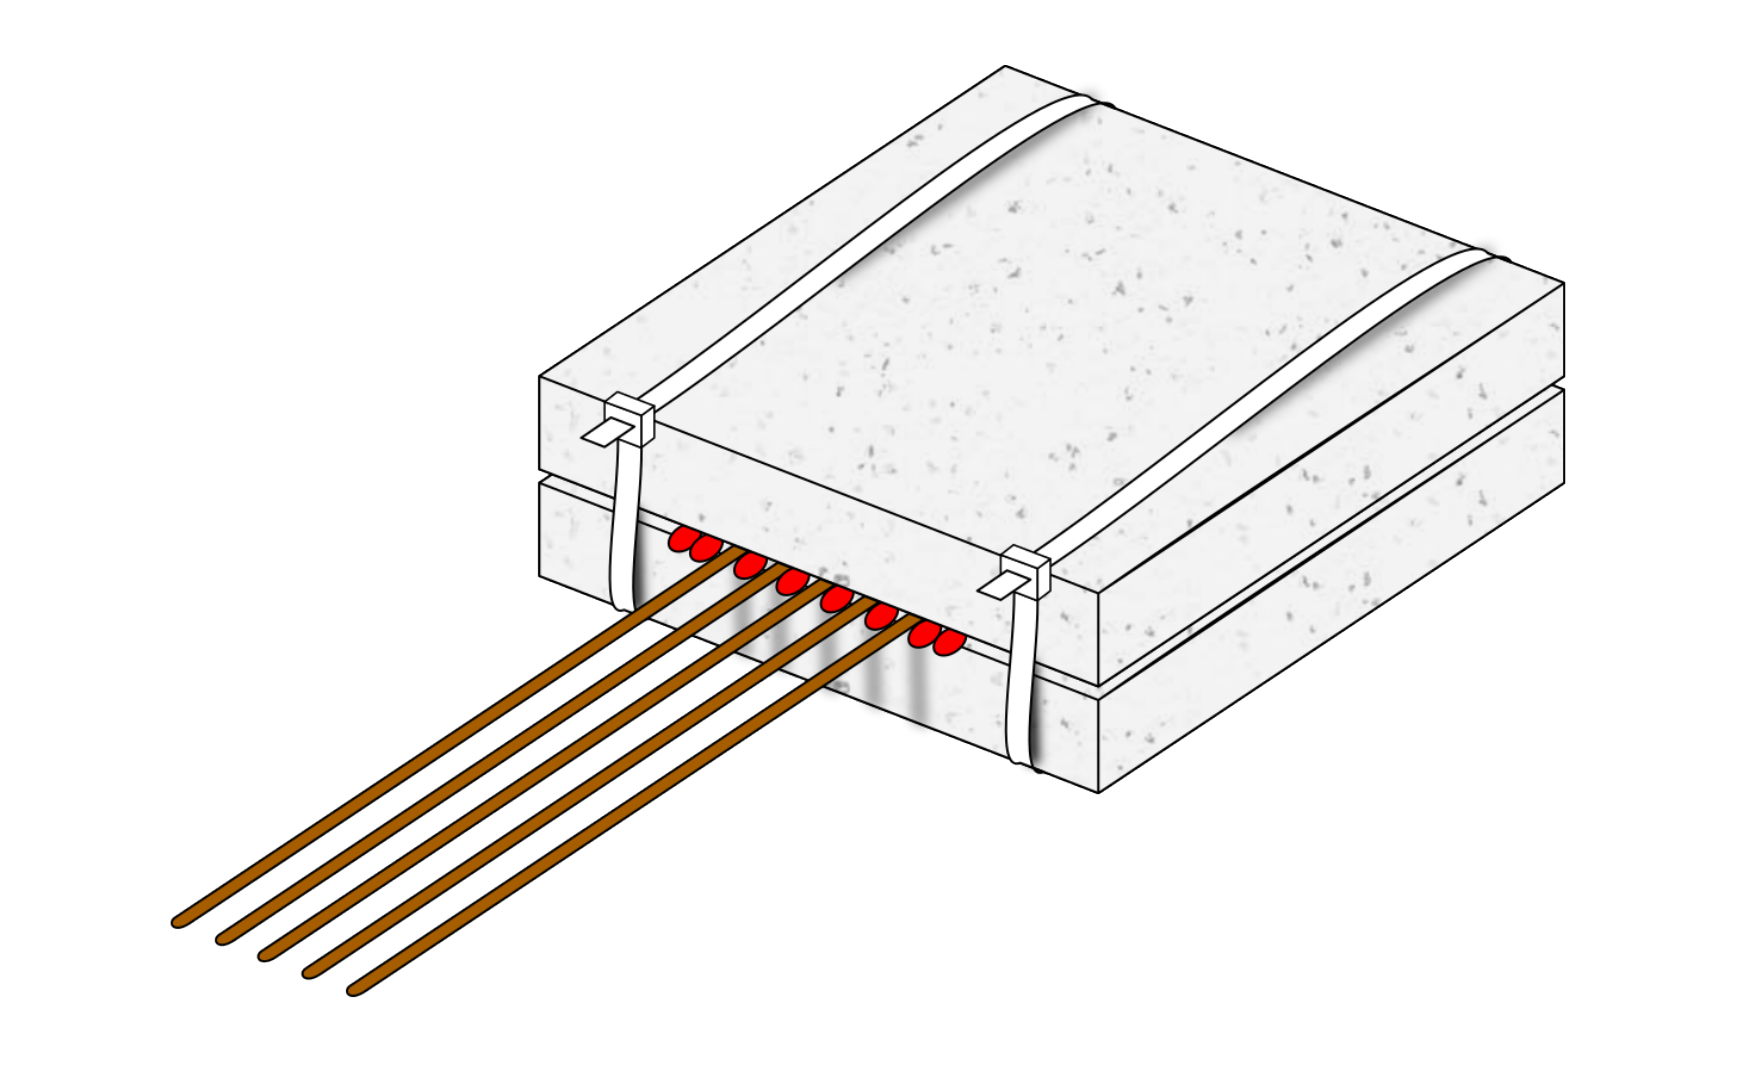
Take two solid rectangular firelighter blocks and glue them together with some liquid glue 5. Then secure them together with cable ties. Before the glue has dried, alternate matches and incense sticks between the blocks. The matches and incense sticks must be touching! To increase the reliability of the igniter, you can use as many incense sticks as you like. If you are concerned about smoke production, use fewer. The matches should protrude far enough from the block to get oxygen, but should be close enough to the firelighter to ignite it reliably.
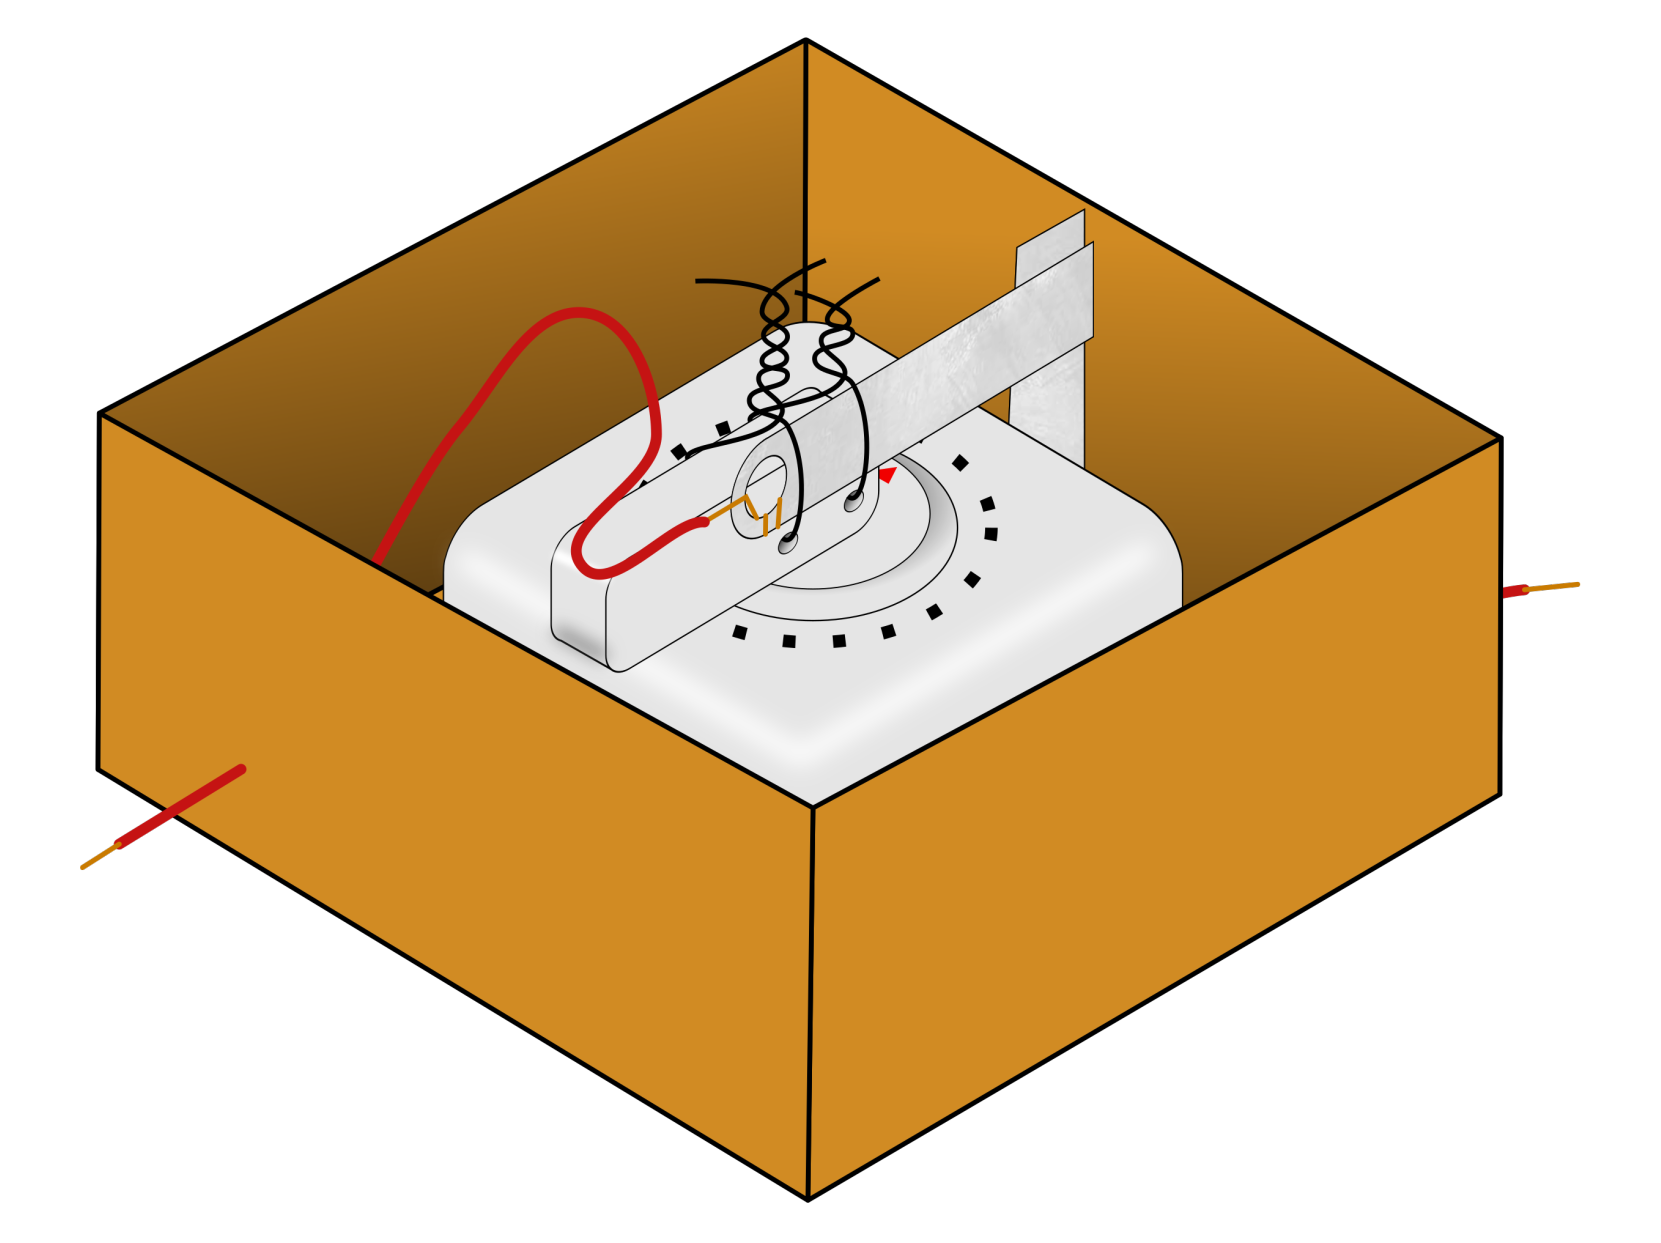
A piece of cardboard is placed around the igniter for protection, which is then secured with cable ties.
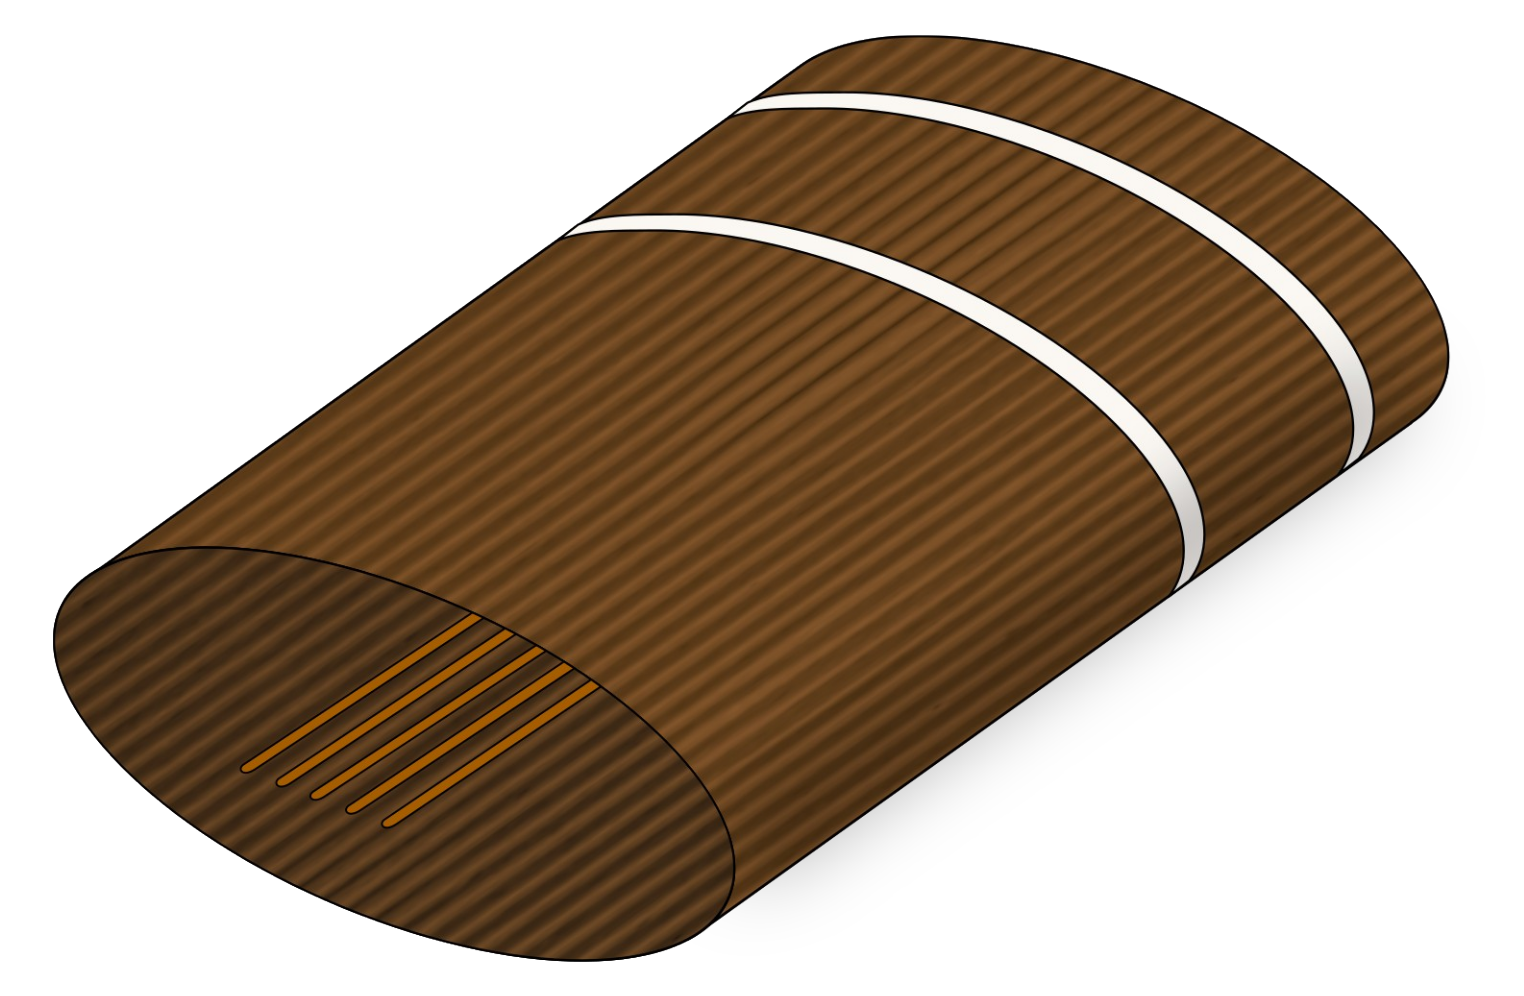
When you light the incense sticks, small flames will usually form at the end of them. Extinguish these by waving, not blowing. At this point you already have your mask on anyway. The pyrotechnic igniter must be placed horizontally so that falling ash does not ignite the matches prematurely. The container with the accelerant is then placed above the igniter.
The incense sticks burn surprisingly well. Even a strong gust of air from a passing train should not extinguish them in the cable shaft.
The Electric Igniter
For most actions, you will need no more than the techniques already described. Keep it simple. However, for longer and/or more precise delays, or if the smoke could be noticed (unlikely in the case of night-time arson of cell towers, power lines, or railroad signal cables), there is no way around electric igniters.
The key ingredient for electric igniters is nichrome alloy wire. Fortunately, a toaster provides enough for several dozen actions, so it’s worth keeping the rest in a safe place outside your home. The wire is difficult to solder. Screw terminals usually do not close completely and therefore cannot hold the flat wire securely. WAGO terminals™ are the best option. 6
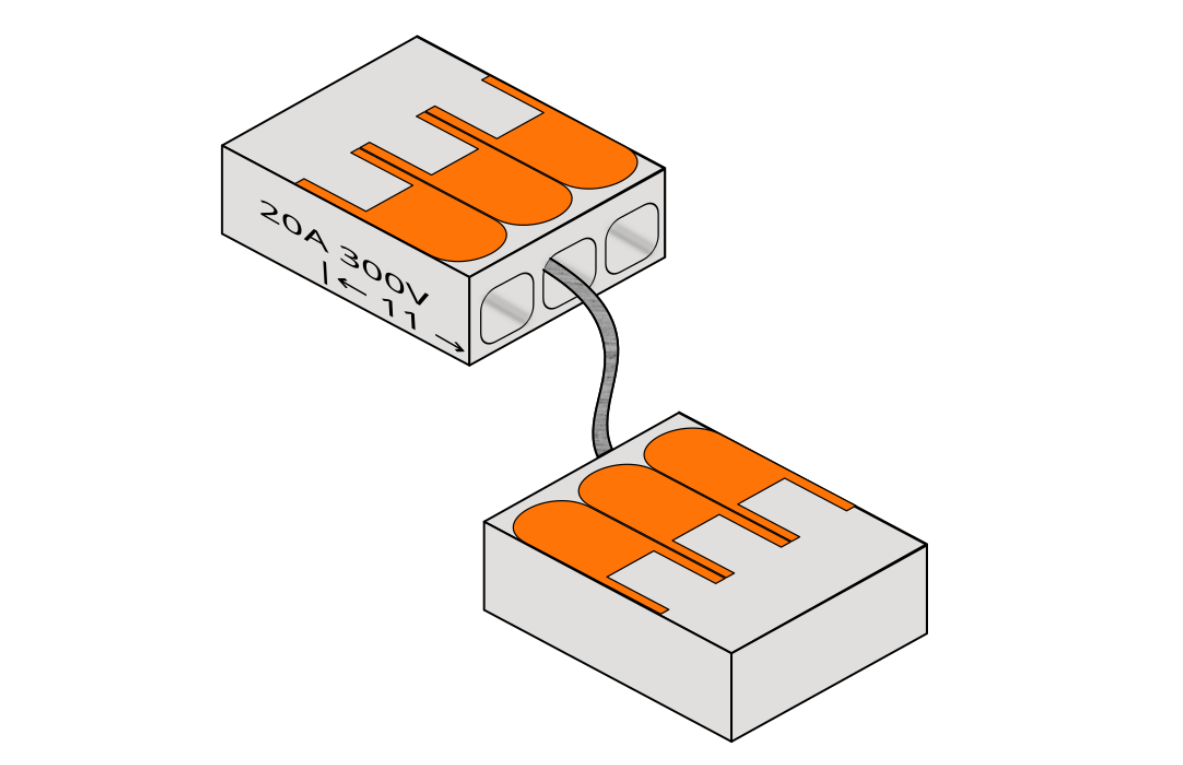
Take a 4.5 cm long piece of toaster wire and push it all the way into the terminals. Depending on the electrical resistance of the wire and the characteristics of the batteries, it may be necessary to experiment with the length. 7.
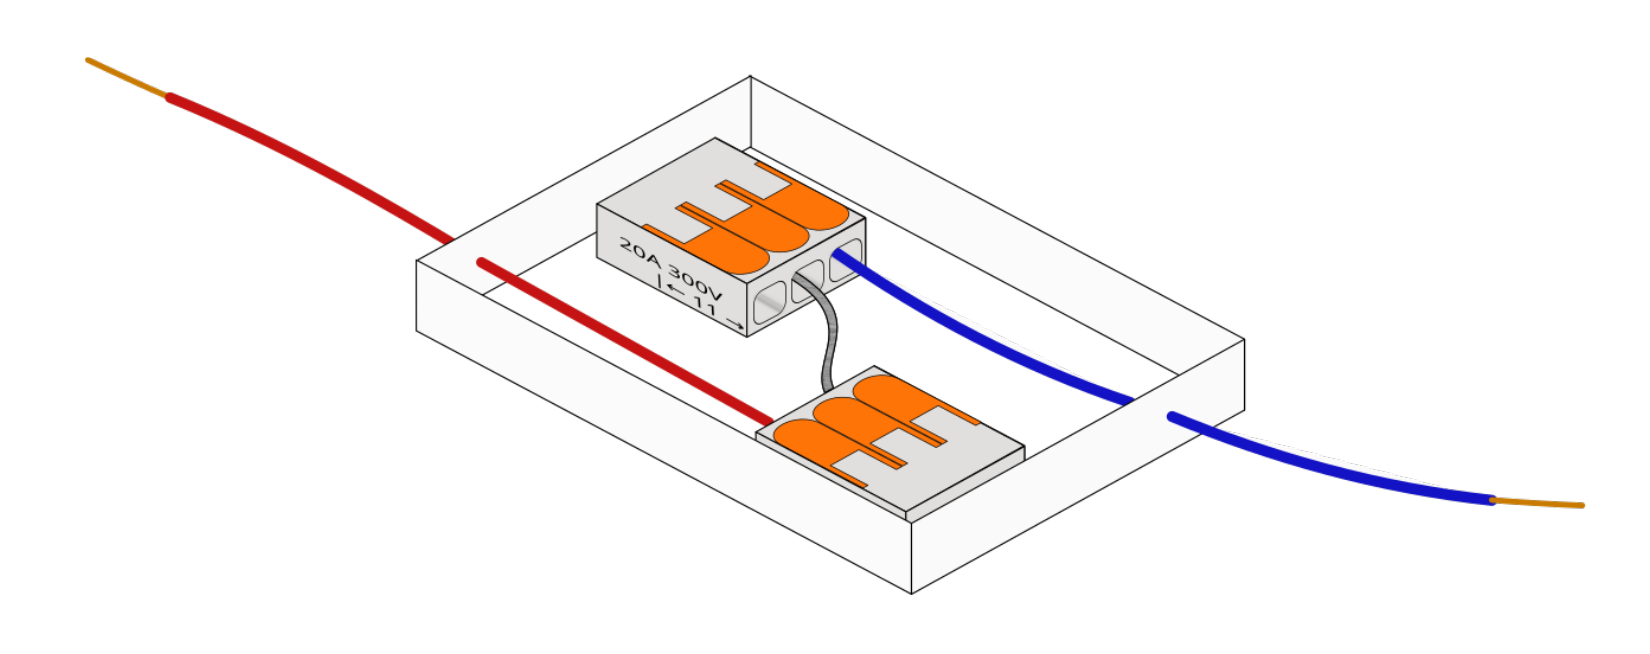
Poke two holes in the sides of an empty matchbox. Attach the terminals to the bottom of the box with liquid glue and wait for everything to dry. Meanwhile, cut off the match heads with scissors. Two or three small boxes should be enough.
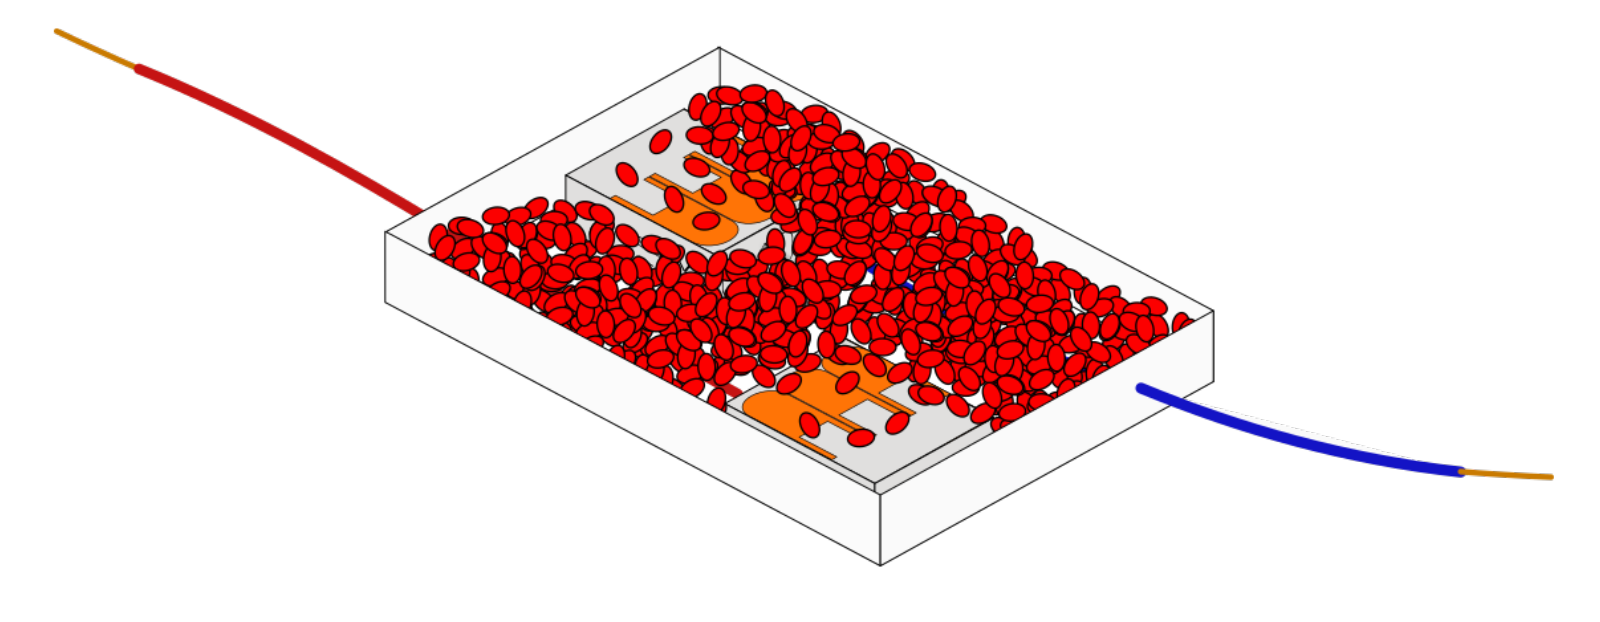
Fill the box to the brim with the match heads. Don’t be too stingy here. A little liquid glue can help hold everything in place, and thus ensure that the toaster wire stays in contact with the match heads. However, too much glue will smother the flame.
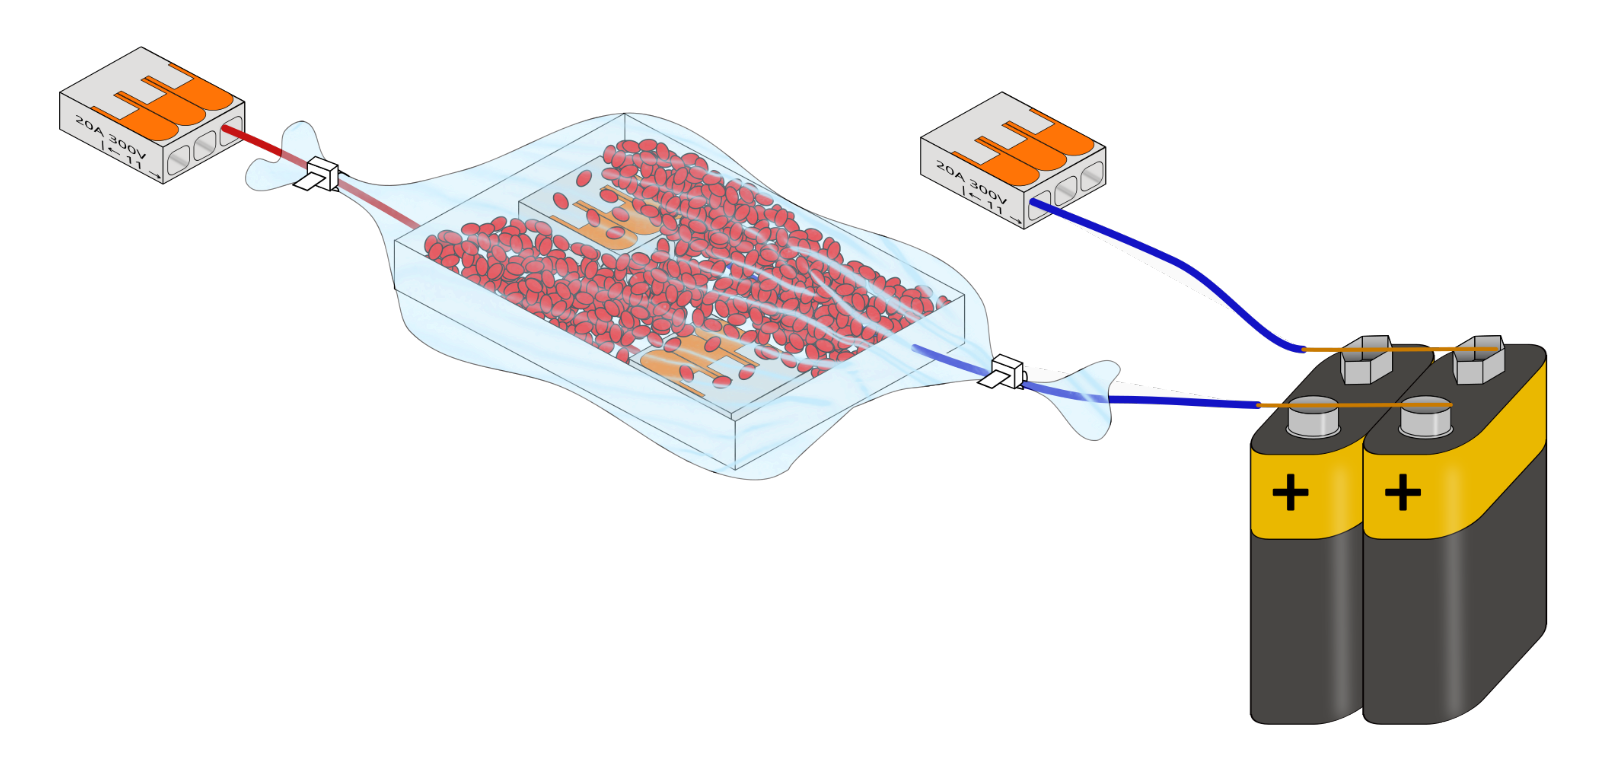
Wrap cling film around the box once, then secure it with liquid glue and cable ties at the ends. There should only be a single layer of cling film so that the heat from the ignition can quickly burn a path to the oxygen.
A voltage of 9 volts is sufficient to make the wire glow, but a single 9-volt PP3-size battery will not provide enough current. Connect two 9-volt batteries in parallel, i.e. plus to plus and minus to minus, so that the currents, not the voltages, add up. With a little practice, you can simply solder the wire to the battery terminals.
The WAGO terminals at the ends of the wires are important. A single accidental contact of these wires will start the fire… burning backpacks are considered suspicious.
The accelerant, igniter, and timer (see below) should only be assembled in close proximity to the site of use.
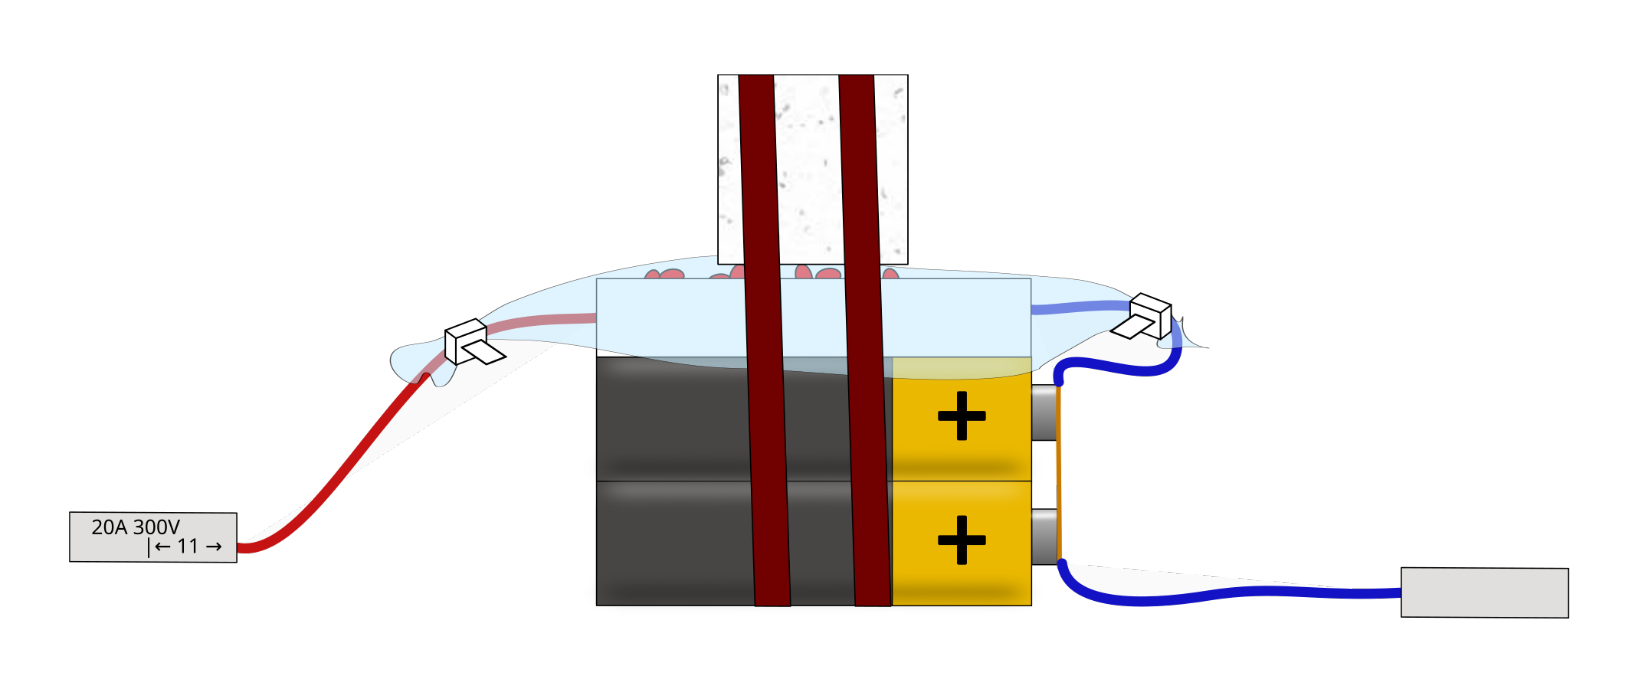
The last step is to attach a piece of a firelighter to the matchbox using cable ties. There shouldn’t be too little firelighter, but it is essential that the match heads still have enough contact with the air.
Now it is time to test. If it is assembled correctly, the firelighter should not smolder slowly when the circuit is closed, but burst into flames immediately. Of course, during testing you can leave more space between the battery and the matchbox so that the two 9-volt batteries are not destroyed during each test — just build the igniter as described, but without the battery, and instead connect the battery with alligator clips for the tests.
Of course, the battery and WAGO terminals can also be integrated into the timer instead of the igniter to minimize the risk of premature ignition. We chose this design because the proximity of the battery and terminals to the point of origin of the fire more reliably destroys DNA traces that may be on them. 8
The Egg Timer Switch
Almost a cliché, but it works. First of all, you need two conductive, reasonably flexible metal strips that you can solder to. One option is filing strips used in file folders. However, you must first remove the non-conductive protective layer.

Then solder wires to both strips. Put a piece of cardboard between the moving part of the egg timer and its case to muffle the ticking noise. It’s best if not everyone notices it right away…

How the metal strips are attached depends on the model of egg timer you are using. In this case, two small holes were burned into the handle with a soldering iron, through which wires were fed. The other metal strip was bent and attached to the case with a screw. For other cases, it might be better to use hot glue or to cut a small slot into which the strips are inserted.
To make sure that the movement of the timer is not obstructed in any way, you can glue it into a cardboard box. The wire must also have enough slack to allow for the necessary movement.
The maximum delay time is (obviously) one hour. The only disadvantage is the more or less loud ticking.
The Ice Block Switch
Longer, albeit imprecise, delays can be achieved with a block of ice and a clothespin.
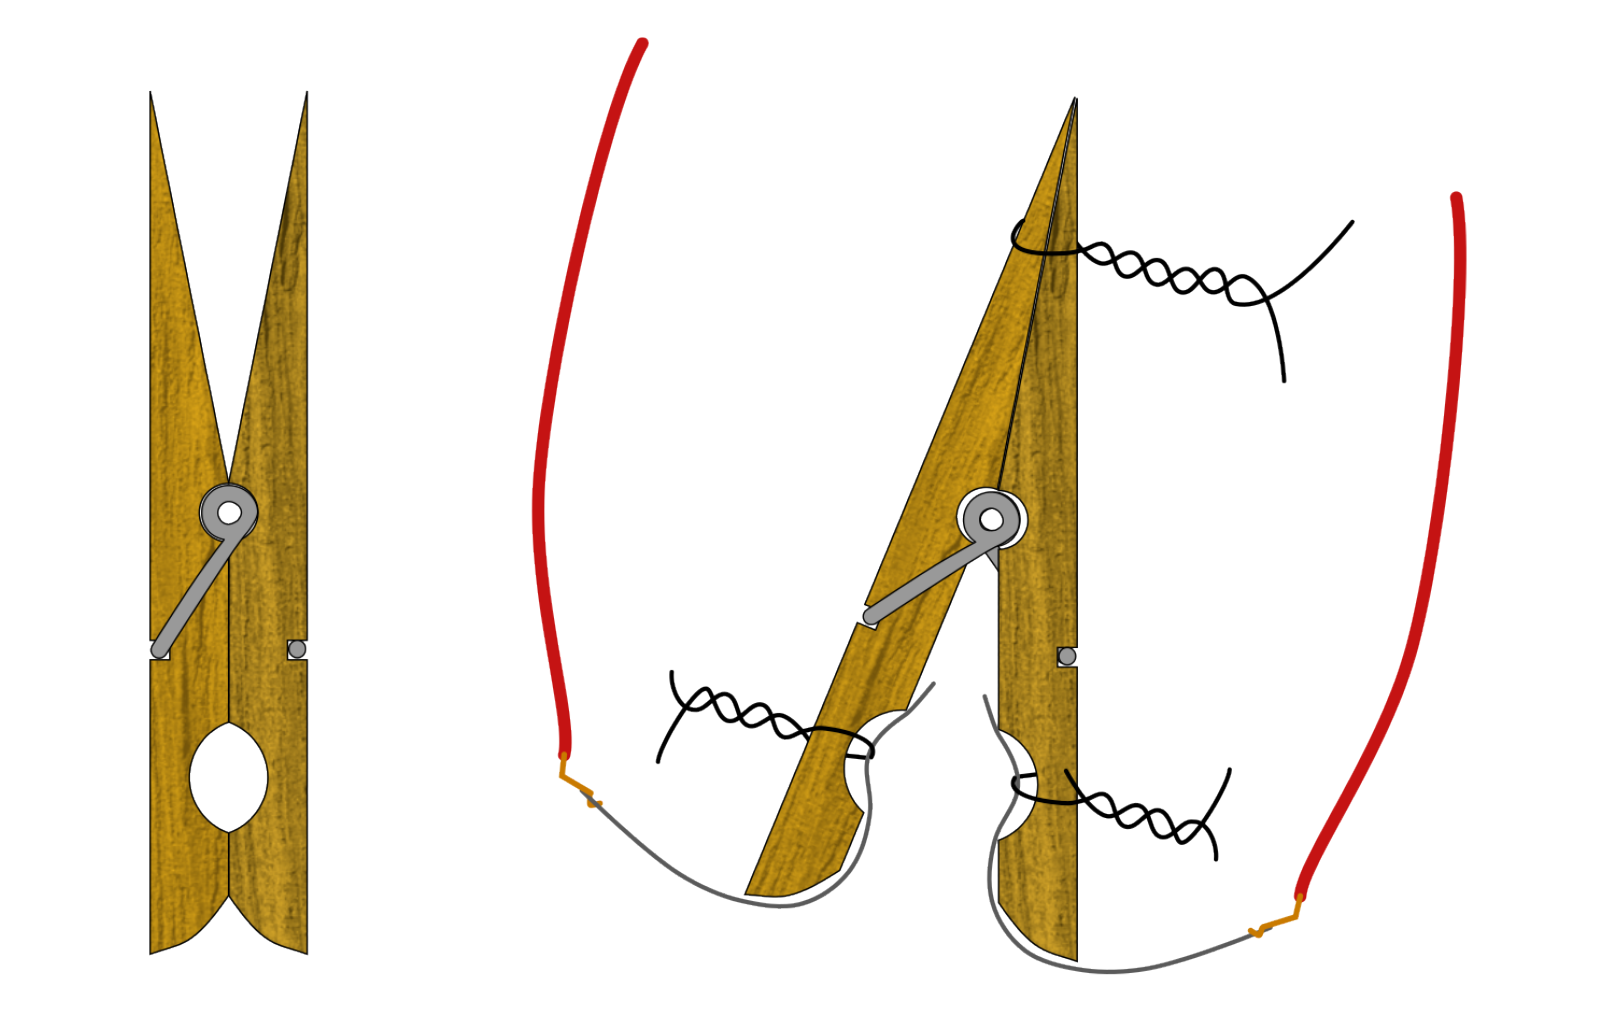
The clothespin must have a strong spring and the widest possible opening angle. Tie its handle ends together with a piece of wire. Then attach two metal strips like the ones described above to the other end with wire. It is important that the metal strips touch each other when the clothespin closes and that they are not in contact with the spring. Otherwise, the circuit will be closed even when the clothespin is in the open position.
Hang the clothespin in a plastic container filled with water so that the upper end still protrudes above the surface. Place the container in a freezer and wait 24 hours.
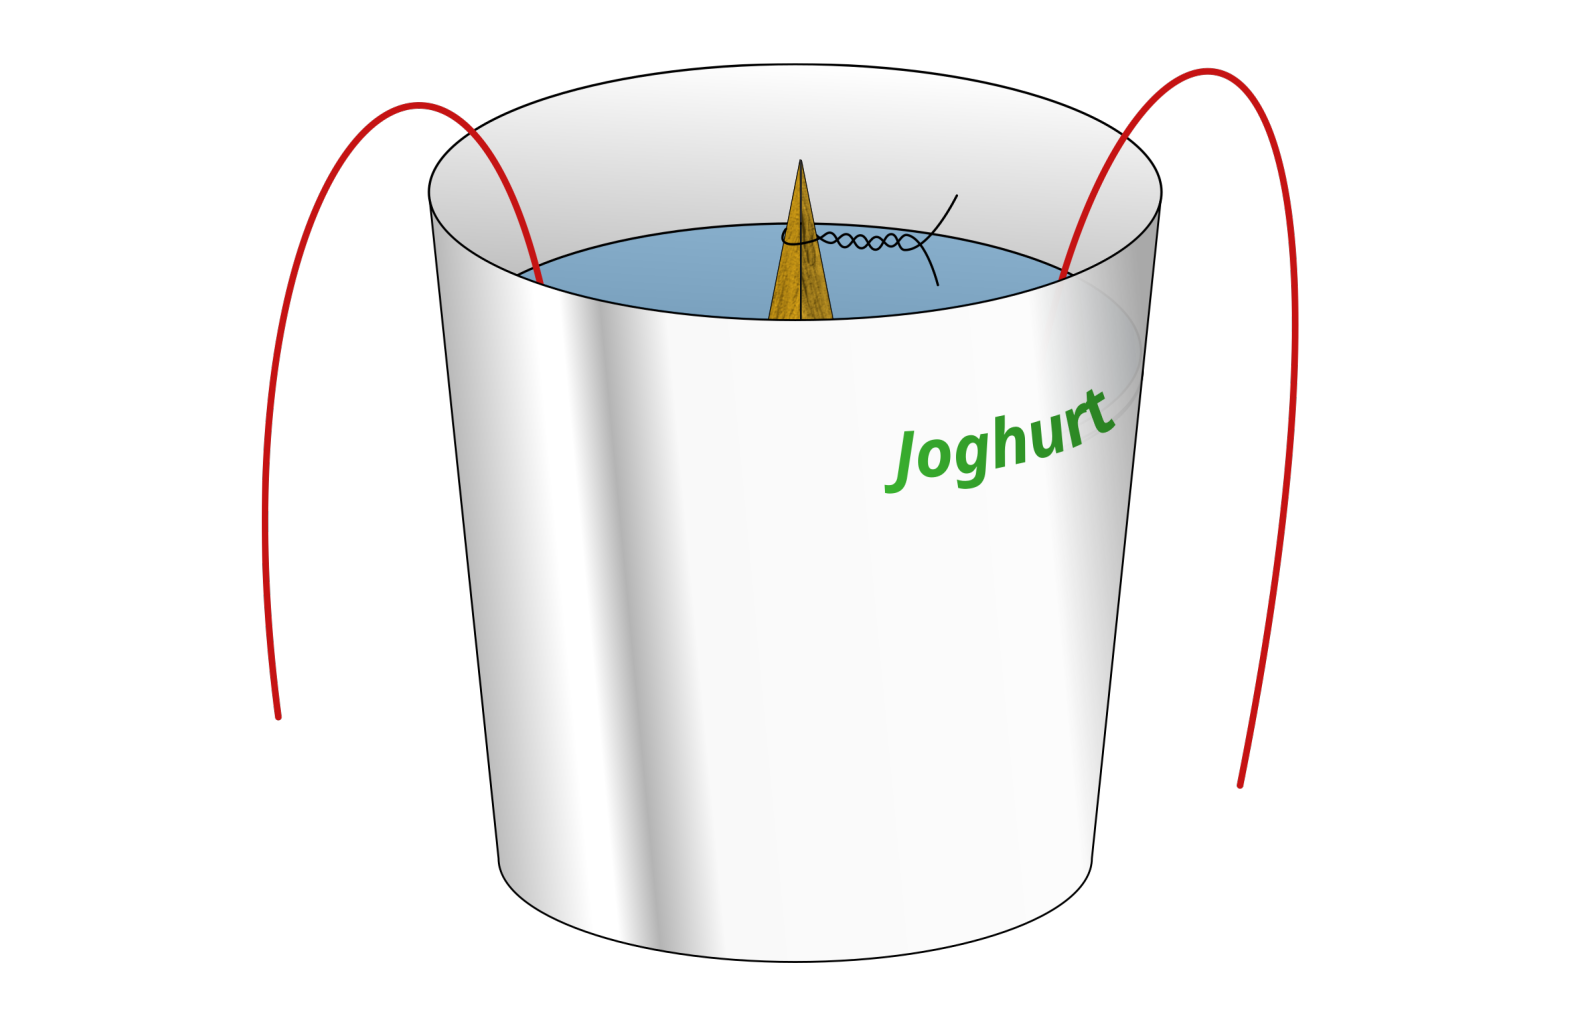
Remove the top wire immediately before placing the incendiary device. You can also try removing this safety wire after the first layer of ice has frozen and then freezing more water over it. This will allow the clothespin to be placed in the center of a block of ice of any size.
One liter of ice should provide a delay of several hours for night-time actions, even in the height of summer. If the block of ice is placed with the plastic cup still holding it, the duration increases considerably because the melting water protects it from the warm air. The disadvantage is that you have left one more thing at the scene of the crime which could have traces on it.
If you have used prong paper fasteners for the metal strips, remember that they are no longer rustproof once the protective coating is removed. Therefore, the ice block must not wait in the freezer forever before being used, and to test the delay duration at different ambient temperatures, a new clothespin must be made each time.
For transporation, an insulated cooler bag is required, which should also spend a few hours in the freezer.
To increase igniter reliability, you could also freeze several completely independent circuits in the same block of ice. If you use several independent circuits, it is important that the wires can be clearly assigned, as the ice block is usually not very transparent. If the wrong connections are made in the heat of the moment, a logical AND circuit is created instead of an OR circuit, which defeats the purpose of the whole thing (i.e. the circuits will no longer be independent).
The Digital Switch
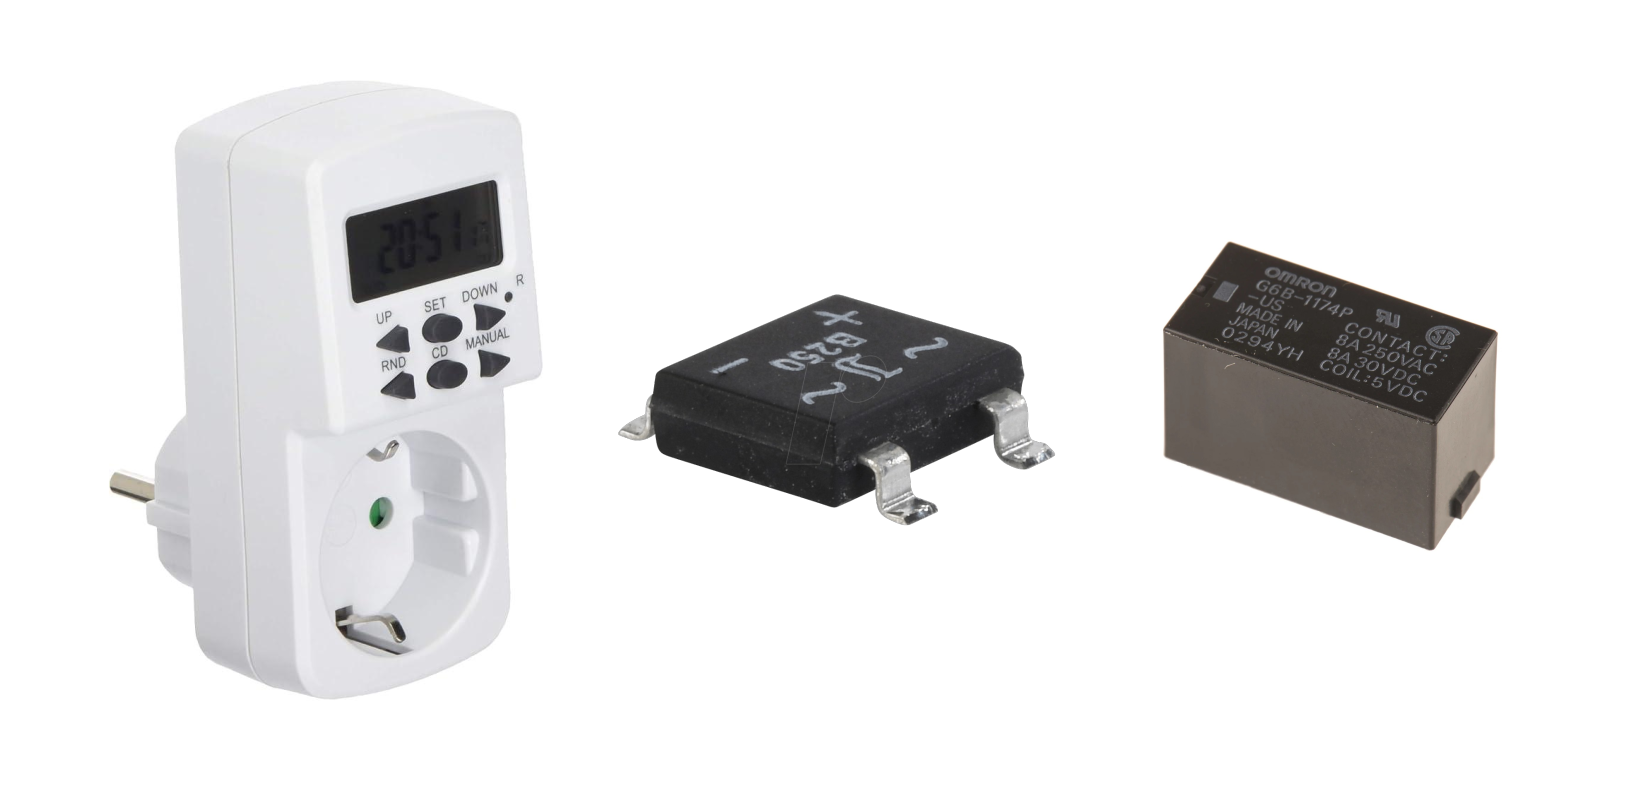
As described in the introduction, the era of self-soldered timer circuits is probably over for most people, at least for the time being. Fortunately, capitalists are never above selling complete timers to revolutionaries for a small profit. An electrical outlet timer with minor modifications is all we need. Since circuit board layouts vary differ from brand to brand and change over the years, only the rough approach is explained here. Basic electronics knowledge and equipment are assumed.
The first step is to get one of these outlet adapters, take it apart, and familiarize yourself with the layout. Of particular interest are the rectifier, probably a small IC with DC output and AC inputs labeled, and the relay, a slightly larger magnetic switch.
Use a soldering iron or saw to cut a new adapter in half, as shown in the illustration, to save space. Put some tape on the sides to make sure it doesn’t fall apart.
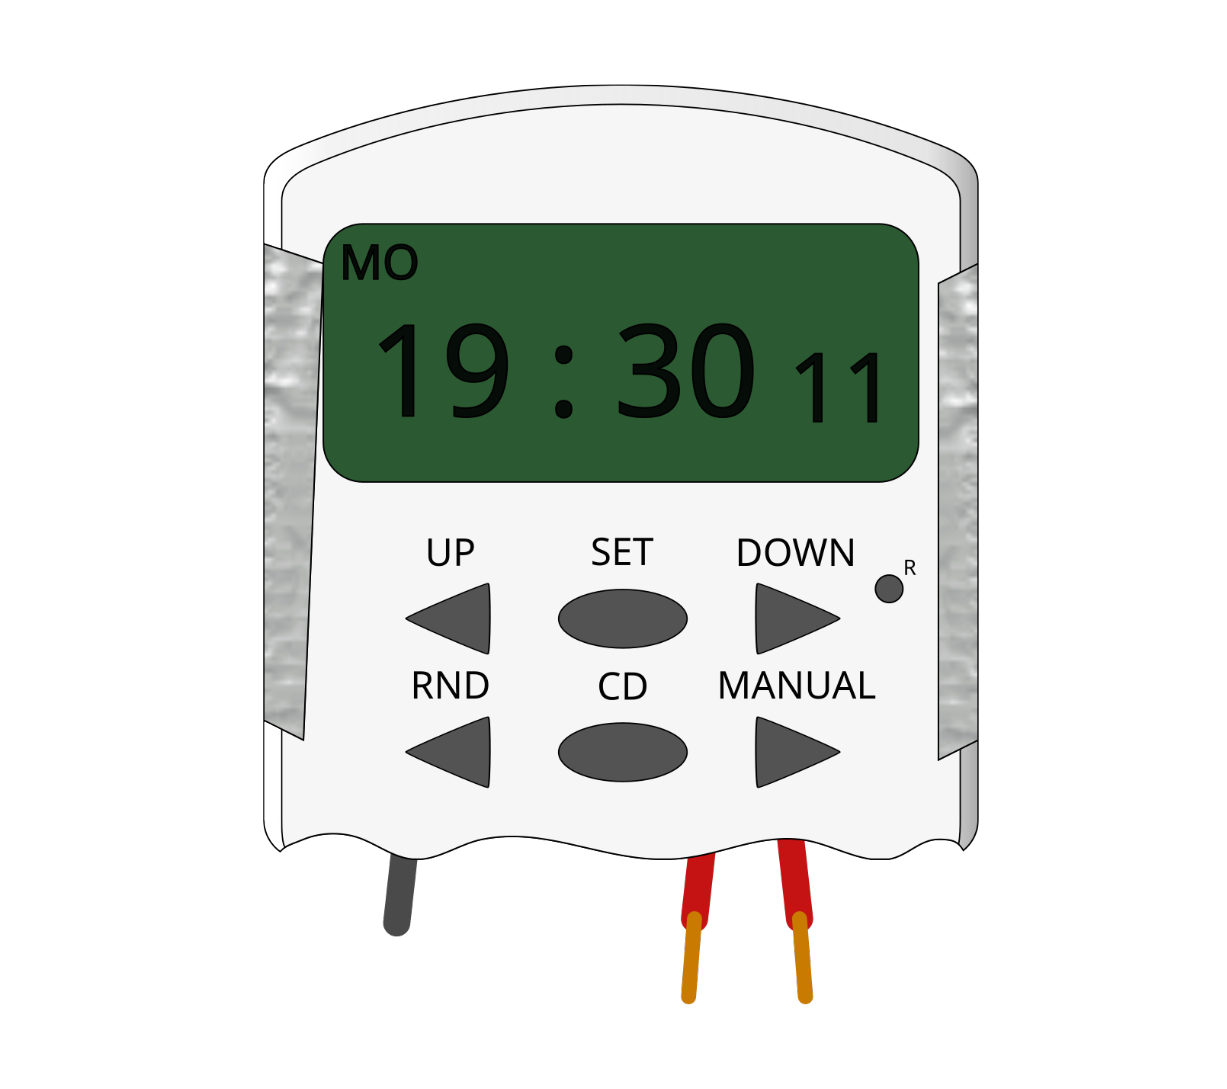
One of the two wire strands of the outlet will be connected to the relay. The other two wires which are connected to this one will be the positive and negative terminals of the resulting timer. The second of the two wire strands of the outlet can be ignored.
If space is not an issue, it is also possible to avoid cutting the outlet adapter in half and simply insert a plug into the adapter instead. The positive and negative terminals of the resulting timer are then the two ends of the same wire, before and after the adapter.
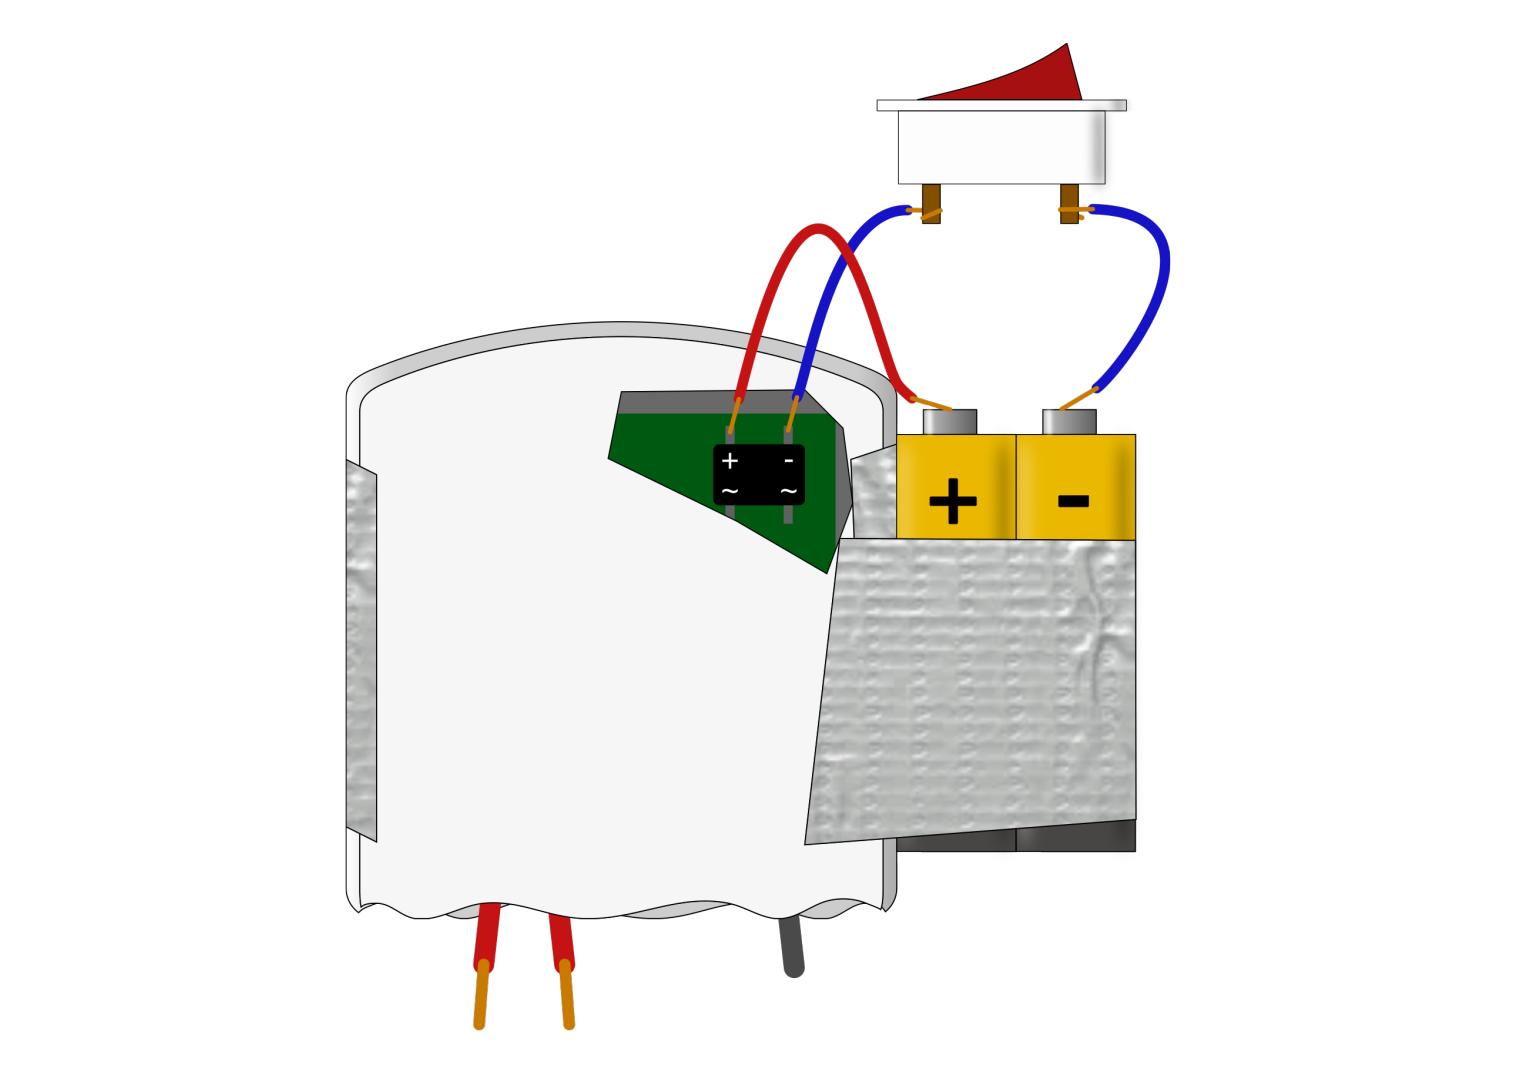
Then (depending on the position of the rectifier) a small hole can be made in the back with a soldering iron to expose the rectifier. We will be replacing the DC output of the rectifier with the DC output of a battery. This is necessary because the built-in batteries, if present, will keep the clock running but will not provide enough voltage to operate the relay. Due to the small size of the rectifier, some soldering experience is required.
The choice of batteries depends on several factors. Firstly, the voltage required by the relay for switching must be determined. In the case of the adapter shown, it was about 12 volts. We connected two 9-volt batteries in series to get 18 volts. 9 The other question is how long the delay will be, which again depends slightly on the ambient temperature 10. With this design we ended up with a delay of about 72 hours, which is a lot, but theoretically an adapter with weekday switching can achieve a delay of 7 days.
So some clever trial and error is required. A combination of batteries connected in series and parallel or a different type of battery may work for you. Battery datasheets are available online and often provide detailed voltage drop curves over the service life of the battery model.
The switch ensures that the igniter can be stored without draining the battery.
And that’s it. If everything went well, you have a timer with a delay time of several days for less than €20.
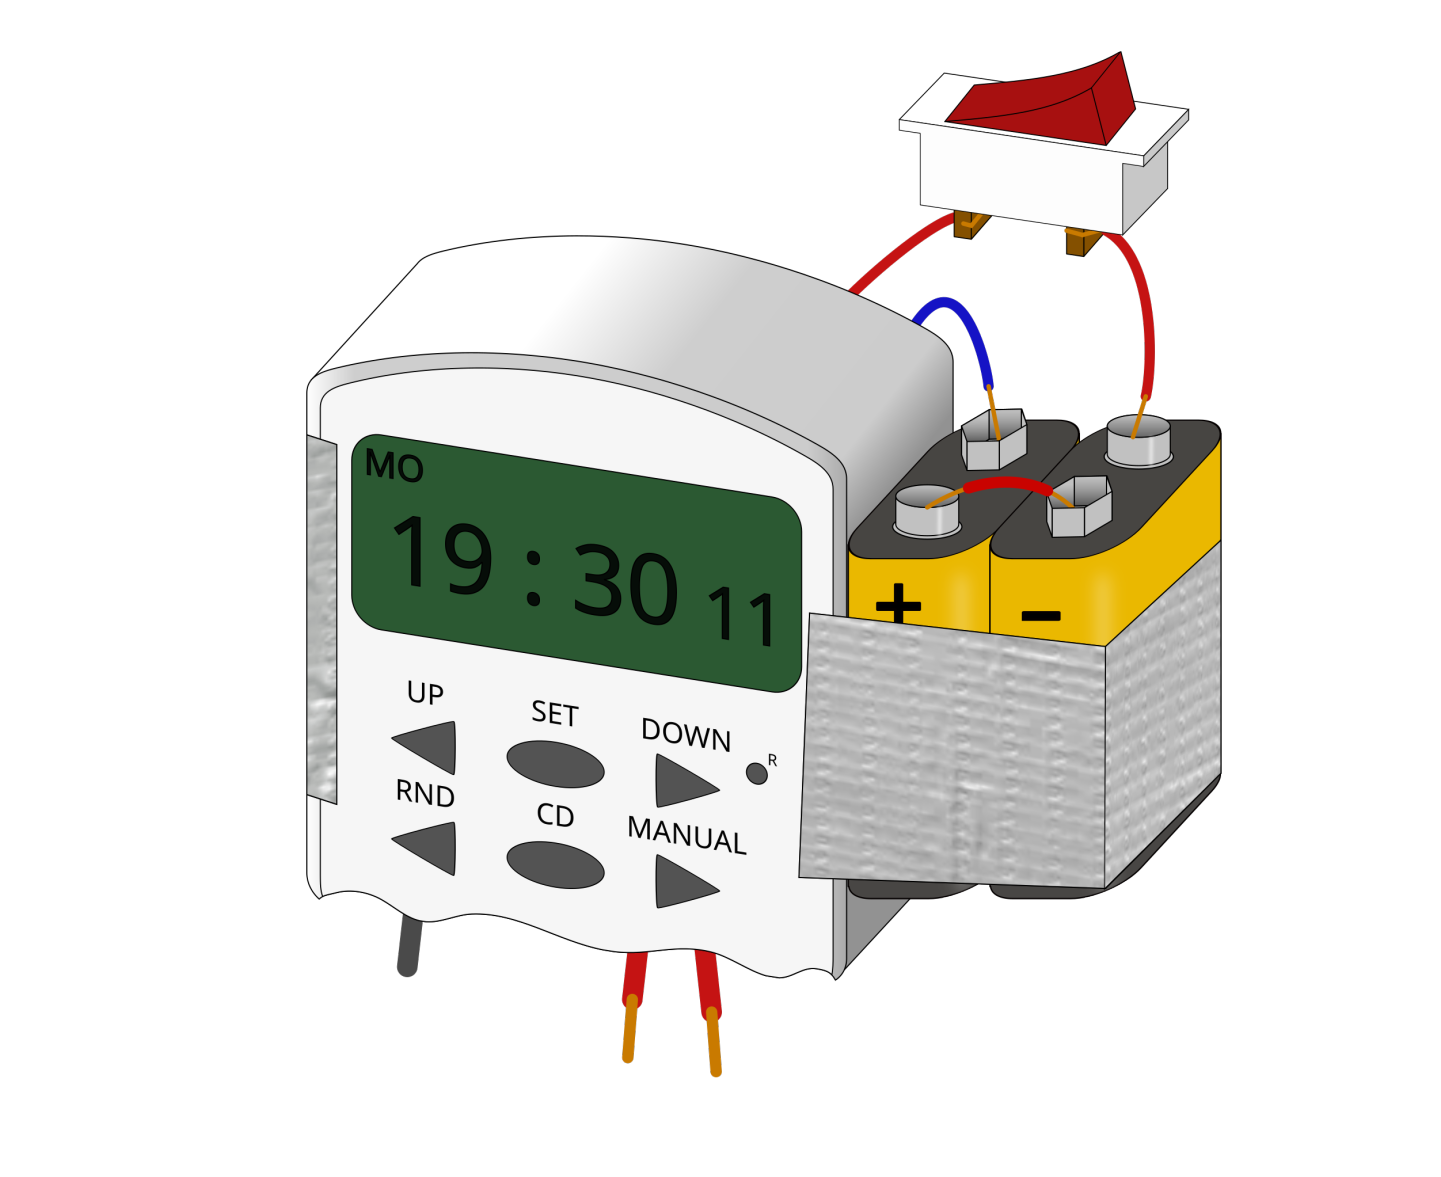
On the day of the action, flip the switch between the battery and rectifier, set the time and day of the week, then set the desired ignition time and you’re ready to go.
On site, before actually connecting the igniter to the two wire ends, you can manually set the adapter to ON for a test. You should hear a soft click. Then switch it back to OFF and then to AUTO.
Some Thoughts on the Psychological Aspects of Militant Actions
Round out the last few pages of a guide like this with some information about traces, encryption, technology, and infrastructure, and you have the technical side covered. The political and psychological aspects of this work are much more complicated. We don’t want to push our political line at this point — you’ll have good reasons for wanting to set cables and machines on fire. But we do want to address the psychological side, which is often underestimated. Although though it can be liberating, carrying out clandestine actions is stressful.
Paranoia is a very real danger in the face of the seeming superiority of vengeful state authorities, and possibly wandering alone in the dark woods or along railroad tracks at night can also be quite frightening. Then there are doubts about your own relevance or legitimacy, or the feeling that you are not doing enough. And then, of course, there is isolation, which intensifies everything. You can’t talk to anyone outside of a small circle of people involved. All fears, worries, but also triumphs and creativity have to be kept under lock and key. You may also have to change your habits or, for security reasons, express opinions in public that are so tame they make you want to scream inside. This may alienate you from those around you.
All this is normal and part of the process, but it needs to be balanced and addressed.
As far as repression is concerned, try to have this clarity: repression is not primarily a consequence of illegality, but of effectiveness. If you are part of an effective movement that the system feels threatened by, you become a target — even if you have “only” prepared food for a mutal aid project and nothing else. But this also means that if your goal is to overcome the status quo, you always have to accept a certain risk of repression. And repression is definitely not a sign of failure. Anyone who fights can lose a battle.
Everyone makes mistakes and everyone even makes stupid mistakes. Usually quite often. Even with the best planning, a police patrol can happen to turn the corner just as you’re about to leave.
In our experience, courage, determination, and energy grow from the certainty that you are doing the right thing. This certainty, in turn, comes from a solid theoretical foundation. This doesn’t mean that you have to spend years studying the “classics” or that you have to get on everyone’s nerves with scene jargon. It does mean that you should take the time to answer the following questions honestly and sincerely. It’s best to do this now. No one wants to ask themselves, “What did I do?” when they read about the latest action in the newspaper or are already at the police station. The “certainty that you are doing the right thing” does not mean arrogant dogmatism. A little residual uncertainty is what makes us human. Try to find answers that feel right, and don’t hide behind political gobbledygook. Your answers should be clear enough for a child to understand. Hell, maybe even a liberal can understand them then!
What really bothers me? What really keeps me awake at night? And what problems am I just talking about because it’s trendy at the moment?
Are the problems related, do they have a common root? Is there a main problem? Who is responsible for my problems? Is someone to blame?
What should the world look like instead? What is the goal? Why do I think this would be desirable? Is there a logical path to get there, a strategy? Do I know methods for the individual steps, do I know tactics?
Has it ever worked? In other words, are there historical examples of my goal, my strategy, and my tactics? If so, are they transferable? If not, why might it work now?
On what do I base my knowledge? Have I been swayed by propaganda? Do I know what I am talking about? What is “the system”? What does resistance mean? Do I know what revolution really implies?
Am I fighting for myself or for others? If I am fighting for others, did they ask me to? If not, would they if they could?
Am I on the left? Or the right? Or neither? What is my social class? How does that shape my thinking? If I write action claims, to whom are they addressed?
How much am I willing to sacrifice? Can I go to prison for a year? Can I go to prison for five years? Or longer? Will my loved ones be taken care of during that time? Can I keep my mouth shut?
Am I looking for recognition? For adventure? For revenge? Is this good or bad? Does revolution have to be fun?
What negative consequences can my actions have on bystanders? Why are they justified? Are they justified? What is violence? To what extent does the end justify the means?
How would I explain my actions or inactions to future generations? Is there any justification for using ineffective tactics?
Do I actually believe in victory? Does the word even exist in my vocabulary? Or do I merely want to fight to ease my conscience?
What if we lose?
And what if we win?
What if we really can win?
Translator notes:
- “Gasoline by itself tends to flash and burn out quickly. Adding an equal part of motor oil to the gasoline will result in a longer-lasting, hotter flame. The best consistency for the fuel is that of a thin jelly rather than the firm butter paste of most flame fuel products.” – from a Paladin Press book ↵
- In Germany, a cable shaft often runs alongside railroad tracks, covered only with concrete slabs. In other national railroad systems, these same cables are instead buried, emerging only at bridges, signal boxes, etc. ↵
- As the ELF guide notes, “electrical tape is like a magnet for hair and skin flakes,” and the same is true of tape in general — it picks up an electrostatic charge when unpeeled from the roll, and this charge is what is responsible for the “magnet” effect. Therefore, the use of tape should be avoided whenever possible. If the use of tape is unavoidable, an anti-static model should have less of a “magnet” effect, but keep in mind that any adhesive surface still presents an increased risk of collecting DNA. Alternatively, glue can be easier to apply in a controlled manner than tape, so that you never have direct contact between your gloves and the adhesive surface. Another option is to use a cable tie, which can often do the job of holding something in place without requiring an adhesive surface. ↵
- Alternatively, you can avoid needing to pour out the gasoline by lighting a firelighter cube placed on top of the plastic bottle, as described in “A Recipe for Leaving No Trace“. ↵
- Firelighters are usually sold in two different forms — as individual cubes or entire blocks. ↵
- Other brands of lever-clamp terminals should also work. ↵
- Longer = more resistance ↵
- See “DNA You Say? Burn Everything to Burn Longer: A Guide to Leaving No Traces” ↵
- “The working life of a battery is extended by wiring an extra battery in series. The voltage will be doubled, but this is not a problem for any of the electrical components. Tape the two batteries together. Then use a battery-snap to connect the negative terminal of one battery to the positive terminal of the other battery. Cut a second battery-snap in half to use on the remaining terminals.” – Setting Fires with Electrical Timers ↵
- See “Electrical Timers in Cold Temperatures”, Setting Fires with Electrical Timers ↵